
SoldadoDeDrogas
Testing Squad
- Language
- 🇺🇸
- Joined
- Nov 16, 2023
- Messages
- 398
- Reaction score
- 304
- Points
- 63
Here it is finally!
I hope you haven't been waiting for me to reinvent the wheel, because this method has been around longer than me!
This is called the "PF Tek" after innovations from a home mycologist by the name of Psilocybe Fanaticus. This is the first method I tried. It worked the first time. I have never had to try another way. It is perfectly suitable for personal use and for a few friends. Down the road, we will show you how to innovate further, for less work, better yields and self sustainability.
So, without further obstruction, here we go:
Materials needed:

A dozen ball mason jars - 1/4 pint widemouth if possible, regular mouth is OK. Widemouth is only necessary for the 1/2 pint jars otherwise you gotta break them to get your cake out. They take longer to colonize and risk contamination so I stick with the 1/4 pints.
Organic brown rice flour. Buy organic brown rice and grind it into powder in your blender.
Vermiculite. Get a bag from the garden section.
Mushroom spores. The good ones. If you don't know where to get them I can help.
Other items: Mixing bowl, spoon. Paper towels. IPA alcohol (to disinfect). Measuring cup.
~ Pressure cooker. ~ I have done it successfully with a normal boiling pot, just need to make sure to cook longer. The point of all this is that it is centered around growing bacteria. We need to make sure we grow the right one. So we kill everything in our growing medium inside the pressure cooker, and then insert the desired bacteria (our spores)
This is essentially the outline of the procedure and what we are attempting to accomplish with this.
Further down the road we will need a terrarium - a rubbermaid tote bin with the cover will work just fine.
We will need a bag of perlite to coat the bottom of the terrarium. With added water it will release slowly thus keeping our terrarium at suitable humidity. The cakes sit on top and spit out shrooms just fine.
....That is about it. Let's go !
1) In a mixing bowl, we add 2/3 cups vermiculite, 1/4 cup brown rice flour and 1/4 cup water for every TWO 1/4 pint jars we plan to innoculate. So FIVE scoops of each would be enough for FIVE - 1/2 pint jars or TEN - 1/4 pint jars. So prepare accordingly. When you add it all together and mix it up it should look something like this:

2) We are going to lightly pack the jar with the growing medium up to about this part where the cap twists on. Pack everything in as neatly and clean as you can, but LOOSELY! Then wipe that lip with your IPA and paper towel to get any residue off the glass and make sure there is no bacteria. (The cooker does the sterilizing so we don't have to get crazy about the "germs" - we just wanna make sure it is nice and clean above that point.

3) After we wipe and disinfect the lip of the jar, we then fill the rest in with a layer of just vermiculite. This will insulate the grow medium from potential outside contamination, keep moisture in etc. We then put our lid back on (As you can see we flip the cover upside down and punched two holes in the cover to inject the spores through) After we cover them with lids, have your assistant (if you have one) cover them with a piece of aluminum foil and place them in your pressure cooker.


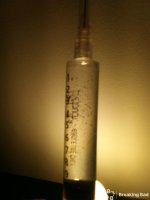
4) You cook your jars for about an hour or two. I like to make sure they have a solid 30 minutes under optimal temp and pressure - when the top on the cooker is whistling and spinning that is when I begin counting. Let it cool down and condense. When you can open it, line up your jars, take the foil off and get ready to innoculate them. MAKE SURE THE JARS HAVE COOLED TO ROOM TEMP before innoculating them. A good spore syringe should be clear liquid with no other funk in there. Only the little specs you can see in the photo, which are our spores.


5) After we have cooked and made sure our jars of growing medium are free from any other living things and contaminates, we are prepared to insert our desired organism to go forth, multiply, and be fruitful. The key here is that we want to get out needle tip past the layer of vermiculite we used to insulate the medium, to the inside surface of the jar on the glass. So when we inject our spores, the growing medium does not soak it up, but rather, it spreads all over the inside surface of the jar and grows inward towards the center. We do not want to inject the spores into the center of the jar. The strategy is that we are flooding out the possible area where any unwanted bacteria might grow with our desired spore so that any unwanted contamination doesn't have a snowballs chance in hell to even get a foothold. It is desirable that our mushroom spores immediately occupy all the real-estate in our jars.


7) As carefully and as cleanly as possible, inject all of your jars. Quickly and without contaminating them. Cover them back with foil. It is good practice to number them in order so you can know where you contaminated. Place then in a box in a warm dark place for the next few weeks, that they may be left undisturbed to colonize their jars. The 1/4 pint jars take about a month or less from start to finish to produce fruit. Usually about 2-3 weeks to colonize after injecting the spores. Then another week or two to "birth" into the terrarium or "fruiting chamber" and for the first flush of mushrooms to be collected.

And with that, this is the end of PART 1. We put all this together and put it on the back burner for a few weeks and go off and do some other things. While we are waiting for these to colonize, let's go grow some weed! I will be back with PART 2 soon! Thank you everybody for your support and patience! Feel free to ask me for help. Any suggestions or anything are always welcome. I love to learn and I want to share and help, thus I teach and pass on the torch.
Good luck and take care for now!
I hope you haven't been waiting for me to reinvent the wheel, because this method has been around longer than me!
This is called the "PF Tek" after innovations from a home mycologist by the name of Psilocybe Fanaticus. This is the first method I tried. It worked the first time. I have never had to try another way. It is perfectly suitable for personal use and for a few friends. Down the road, we will show you how to innovate further, for less work, better yields and self sustainability.
So, without further obstruction, here we go:
Materials needed:
A dozen ball mason jars - 1/4 pint widemouth if possible, regular mouth is OK. Widemouth is only necessary for the 1/2 pint jars otherwise you gotta break them to get your cake out. They take longer to colonize and risk contamination so I stick with the 1/4 pints.
Organic brown rice flour. Buy organic brown rice and grind it into powder in your blender.
Vermiculite. Get a bag from the garden section.
Mushroom spores. The good ones. If you don't know where to get them I can help.
Other items: Mixing bowl, spoon. Paper towels. IPA alcohol (to disinfect). Measuring cup.
~ Pressure cooker. ~ I have done it successfully with a normal boiling pot, just need to make sure to cook longer. The point of all this is that it is centered around growing bacteria. We need to make sure we grow the right one. So we kill everything in our growing medium inside the pressure cooker, and then insert the desired bacteria (our spores)
This is essentially the outline of the procedure and what we are attempting to accomplish with this.
Further down the road we will need a terrarium - a rubbermaid tote bin with the cover will work just fine.
We will need a bag of perlite to coat the bottom of the terrarium. With added water it will release slowly thus keeping our terrarium at suitable humidity. The cakes sit on top and spit out shrooms just fine.
....That is about it. Let's go !
1) In a mixing bowl, we add 2/3 cups vermiculite, 1/4 cup brown rice flour and 1/4 cup water for every TWO 1/4 pint jars we plan to innoculate. So FIVE scoops of each would be enough for FIVE - 1/2 pint jars or TEN - 1/4 pint jars. So prepare accordingly. When you add it all together and mix it up it should look something like this:
2) We are going to lightly pack the jar with the growing medium up to about this part where the cap twists on. Pack everything in as neatly and clean as you can, but LOOSELY! Then wipe that lip with your IPA and paper towel to get any residue off the glass and make sure there is no bacteria. (The cooker does the sterilizing so we don't have to get crazy about the "germs" - we just wanna make sure it is nice and clean above that point.
3) After we wipe and disinfect the lip of the jar, we then fill the rest in with a layer of just vermiculite. This will insulate the grow medium from potential outside contamination, keep moisture in etc. We then put our lid back on (As you can see we flip the cover upside down and punched two holes in the cover to inject the spores through) After we cover them with lids, have your assistant (if you have one) cover them with a piece of aluminum foil and place them in your pressure cooker.
4) You cook your jars for about an hour or two. I like to make sure they have a solid 30 minutes under optimal temp and pressure - when the top on the cooker is whistling and spinning that is when I begin counting. Let it cool down and condense. When you can open it, line up your jars, take the foil off and get ready to innoculate them. MAKE SURE THE JARS HAVE COOLED TO ROOM TEMP before innoculating them. A good spore syringe should be clear liquid with no other funk in there. Only the little specs you can see in the photo, which are our spores.
5) After we have cooked and made sure our jars of growing medium are free from any other living things and contaminates, we are prepared to insert our desired organism to go forth, multiply, and be fruitful. The key here is that we want to get out needle tip past the layer of vermiculite we used to insulate the medium, to the inside surface of the jar on the glass. So when we inject our spores, the growing medium does not soak it up, but rather, it spreads all over the inside surface of the jar and grows inward towards the center. We do not want to inject the spores into the center of the jar. The strategy is that we are flooding out the possible area where any unwanted bacteria might grow with our desired spore so that any unwanted contamination doesn't have a snowballs chance in hell to even get a foothold. It is desirable that our mushroom spores immediately occupy all the real-estate in our jars.
7) As carefully and as cleanly as possible, inject all of your jars. Quickly and without contaminating them. Cover them back with foil. It is good practice to number them in order so you can know where you contaminated. Place then in a box in a warm dark place for the next few weeks, that they may be left undisturbed to colonize their jars. The 1/4 pint jars take about a month or less from start to finish to produce fruit. Usually about 2-3 weeks to colonize after injecting the spores. Then another week or two to "birth" into the terrarium or "fruiting chamber" and for the first flush of mushrooms to be collected.
And with that, this is the end of PART 1. We put all this together and put it on the back burner for a few weeks and go off and do some other things. While we are waiting for these to colonize, let's go grow some weed! I will be back with PART 2 soon! Thank you everybody for your support and patience! Feel free to ask me for help. Any suggestions or anything are always welcome. I love to learn and I want to share and help, thus I teach and pass on the torch.
Good luck and take care for now!
Attachments

Last edited: